GBE > Encyclopaedia > Code > Defects > G#12823
GBE Bird Box Installation Defects
GBE Bird Box Installation Defects
About:
Information Provided
- I had a brief conversation regarding sealing and damp proofing the joint between the edge of the box and the inner face of the outer leaf,
- I think he was of the opinion that where the box is located a bead of sealant would be adequate for both purposes and the DPC material could be dispensed with
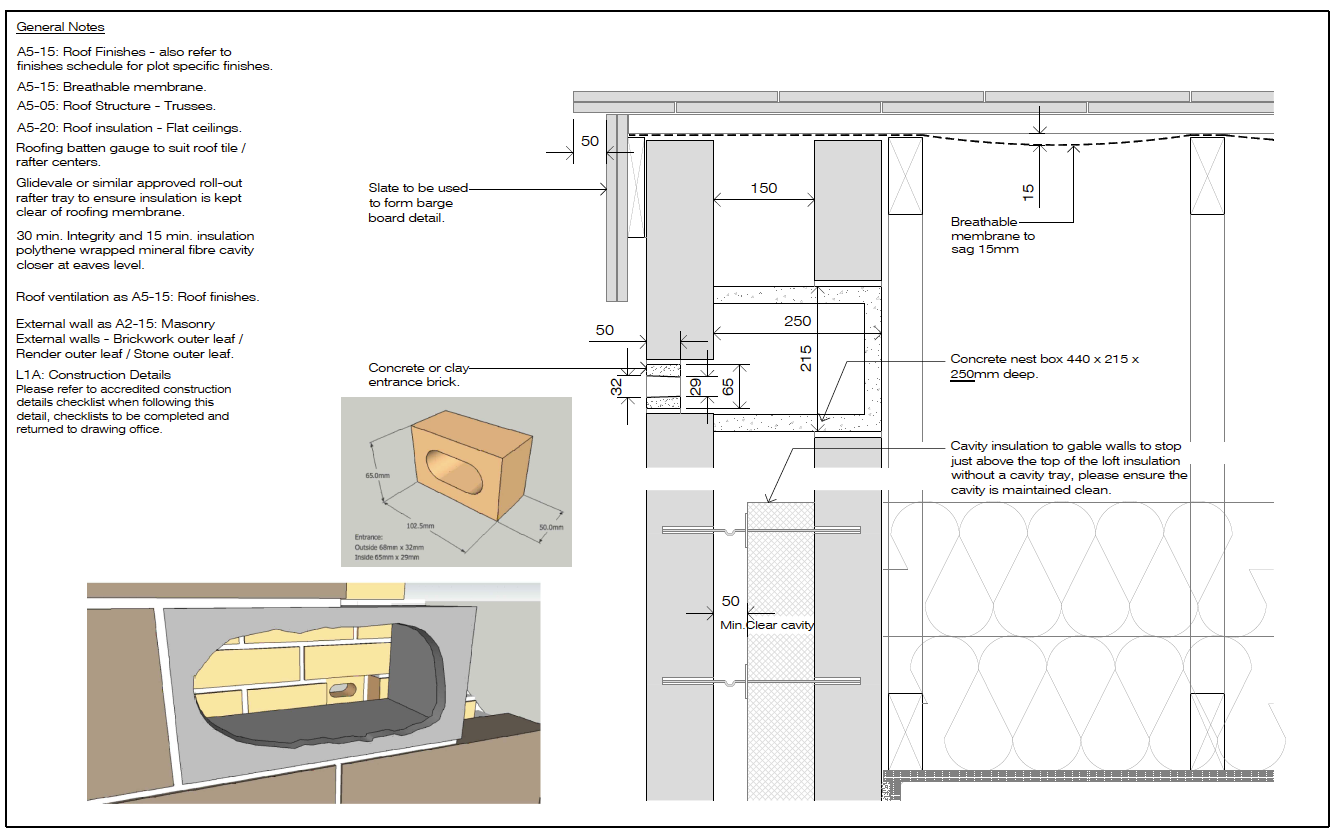
- Here are the, drawing and photos of the bird box installed, its located in a gable wall backing on to a cold void,
- I have also attached the working drawing produced and approved by contractor’s technical team.
- I want to make certain that the box is a sealed unit to prevent any bird parasites or other invertebrates getting into the cavity and ensure that building control wont have any issues with damp proofing, I would value your input.
- It would also be good if you could give some thought to how this idea could be adapted for installation under eaves backing onto living space.
GBE Responses
- I have studied the drawings and photographs and have the following observations:
- Cavity wall construction was developed to separate the inner leaf from the outer leaf to prevent moisture passage from the outer to the inner.
- What is know is that rainwater running down the outer face of the outer leaf can pass through porous bricks or mortar joints and run down the inside face of the outer leaf.
- This will occur on the gable wall above the habitable construction.
- Any object in the cavity has the potential to bridge the cavity and create a path for that water to cross the cavity and enter the inner leaf, once in the inner leaf it can migrate downwards in the porous blockwork until visible in the plaster in the habitable accommodation.
- This then has the potential to reactivate ever-present spores in the atmosphere which land on the damp surfaces leading to mould and potentially to rot.
- Any objects in the cavity or bridging the cavity always have a cavity tray DPC built in over the object with a horizontal damp proof courses linked by sloping damp proof cavity tray to encourage any moisture in the cavity to drain downwards and outwards preventing it reaching the object.
- Currently with the box built into the inner leaf and cantilevering across the cavity but falling short of the inside face of the outer leaf there is say a 5 mm gap.
- This gap has the potential to permit water on the inside face of the outer leaf to pass by the box and continue down towards the insulated cavity below.
- The proposal to close the gap with sealant makes sense for many reasons, preventing rainwater, moisture vapour, dust, cavity ventilation air, insects, bird parasites or other invertebrates getting into the box and urine and solids getting out of the box and into the cavity, to fall onto the insulation in the cavity below, potentially creating a bridge across the cavity.
- It also has the potential to complete the bridge across the cavity and offer the water the route across the cavity towards the inner leaf.
- So in my opinion the design team was wrong and the site agent was right, and the sealant on its own is not the whole answer.
- A cavity tray DPC is essential.
- I am confident the Building Control Officer will share my opinion.
- The cost of the cavity tray is small compared to the cost of the whole building.
- The cost of the cavity tray is more expensive than no cavity tray.
- The cost of the cavity tray is small compared to correcting the damp penetration.
Eaves Variation
- You also asked about applying the same construction assembly at eaves level against insulated external cavity walls.
- In this case I make the following observations:
- Insulation was introduced to the cavity to save energy costs by reducing heat loss from inside the occupied space through the inner leaf and chimney’d away in the ventilated cavity.
- By building the box into the inner leaf cantilevering across the cavity and connecting to a bird entry brick in the outer leaf creates a thermal bridge through the body of the box walls floors and roof and a thermal bypass through the air space in the box.
- This effectively brings external air conditions to within 20-30 mm. of the occupied and warmed spaces inside with no thermal conductivity insulation between inside and out.
- This has the potential for noisy neighbours disturbing each other, in either direction, leading to potential conflict and removal.
- This also has the potential for the cold moist external air inside the box and the heat flow from the occupied space to create condensation on the inside face of the inner leaf over the concentrated area of the box.
- This condensation can reactivate ever-present spores in the atmosphere that land on the moist surfaces, leading to mould and potentially rot.
- This is not competent.
Proposal:
- The suggestions I make is to insulate the back of the box with aerogel insulation or bespoke Vacuum Insulated Panel insulation to the same U value as the surrounding wall.
- Both materials are available in aluminium foil facing protecting them from moisture ingress.
- This will force the box to be built into the wall set outwards away from the inside face of the inner leaf.
- The repositioning should be no more than 1/3 of the inner leaf thickness.
- 30 mm of aerogel (6 x 5 mm. layers) in a 100 mm. leaf (thicker leafs are common today)
- 30 mm. of VIP (3 x 10 mm layers) in a 100 mm. leaf
- Aerogel and bespoke VIP are expensive but the detail is small.
- Ideally the sides of the box are insulated as well to link the cavity insulation to the box back insulation and thermal break the thermal bridge through the adjacent blockwork, through the box wall.
- Now the detail is getting more complicated and more expensive.
- The repositioning may lead to the box being built into both inner and out leaf, bridging the cavity.
- However being built close under the eaves means there is little or no exposed wall above the box and below the eaves, so the roof tiling or slating or metal cladding provides rainwater protection and the cavity should remain dry at this high level.
I do hope the above is helpful even if not what you had hoped to hear.
PS
- I have had a second look at the detail.
- The drawn detail shows the box close to the ridge of the gable so it is sheltered by the roof tiling and the barge board
- So at this high position the cavity tray is not essential.
- Lower down in the gable wall my previous comments apply.
- However the photograph through the scaffolding, of the outer leaf and inner leaf beyond, shows this is low enough on the gable to be exposed to weather and should have the cavity tray DCP.
- I also notice that the block height box built into the inner leaf and the brick height entrance in the outer leaf are not coordinated and do not show the reality.
- the bottom of the brick and the bottom of the box should align on a brick and block bed joint at the same height.
- The cutaway illustration shows the reality.
- So there is a step in the floor after entering the entrance brick.
PPS
- On the matter of ‘box as a sealed unit to prevent any bird parasites or other invertebrates getting into the cavity’
- Your original idea about a bead of sealant makes sense in this detail, however it should be selected to be nature (bat and bird) friendly.
- That is a tall order since most are synthetic and solvent based, so likely to be off-gassing VOCs
- Avoid bitumen based sealant
- Avoid non-setting sealants
- Consider Linseed oil putty (glazing putty) is natural but still off gases plant based solvents,
- On windows its usually painted with oil paint to protect it.
- In the cavity below a DPC Tray it probably does not need painting.
- Could it attract insects or birds as a food source?
- Try to avoid tooling the sealant into the 5 mm gap and into the reach of beaks from the inside of the box
© GBE NGS ASWS Brian Murphy aka BrianSpecMan
26th August 2016
GBE Bird Box Installation Defects
Images:
The intention
However:
The rear box and the front entrance are not coordinated, with should be based in the same level bed joint, resulting in a step in the base just inside the entrance. (above)
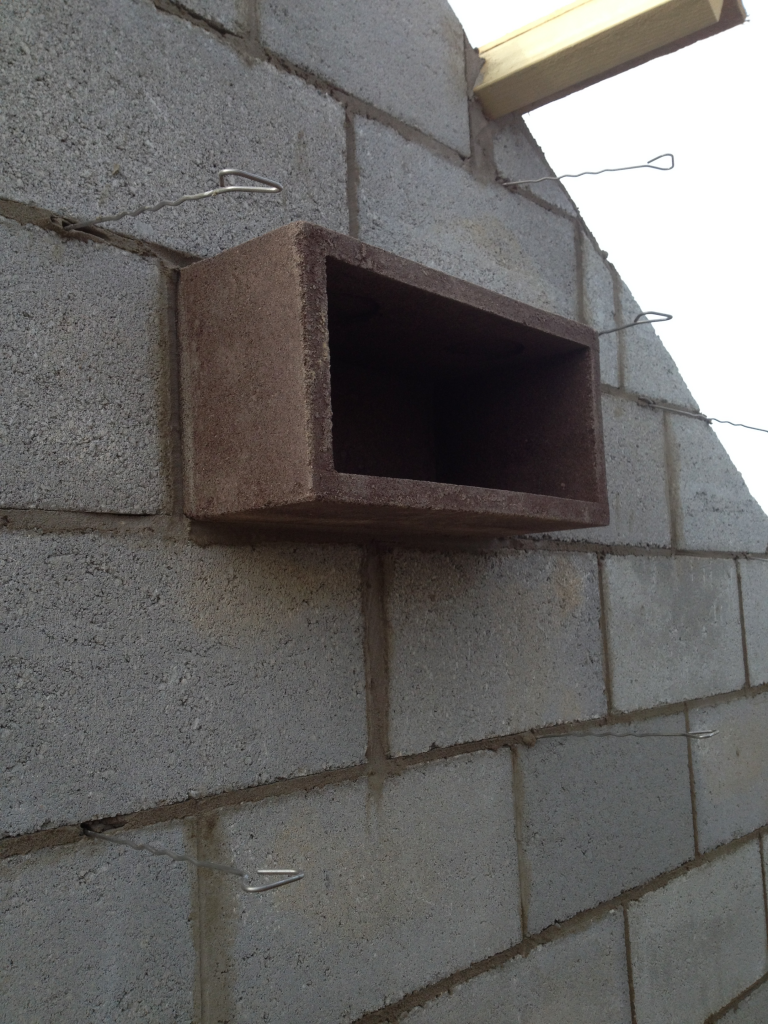
The inner leaf, wall ties and inner box installed early (above)

The outer leaf added later, BS Code of Practice for Masonry tolerances are too generous and inaccuracy result in a 5 mm gap between the inner box and the outer leaf (above)
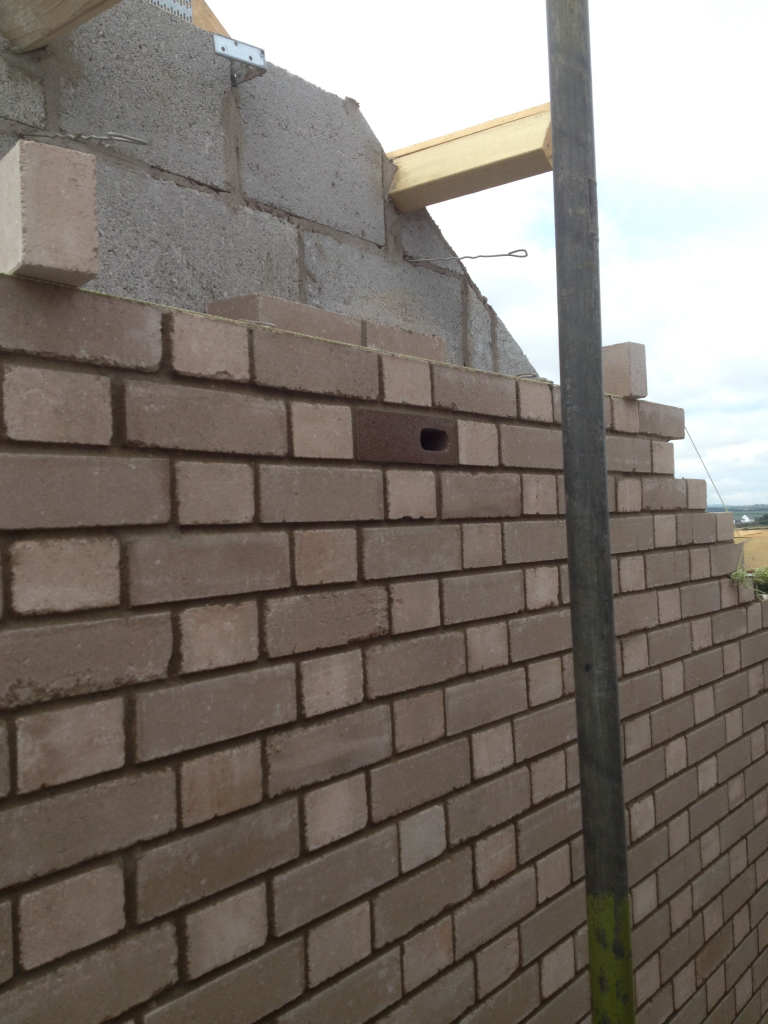
Partially complete installation from outside low on gable wall above external wall/attic insulation junction (above)
NB: the brickwork is designed to mimic solid wall brick bond whilst being a cavity wall.
Being a purpose made half bricks there is a subtle difference in colour down to a different batch of clay or different firing
© GBE NGS ASWS Brian Murphy aka BrianSpecMan
26th August 2016
GBE Bird Box Installation Defects
See Also:
GBE Jargon Buster
Theme
- Biodiversity (Jargon Buster Theme) G#645 N#667
GBE CPD
Topic
- Biodiversity (CPD Topic) G#568 N#588
GBE Solutions
GBE Systems
- Cambridge swift box system
GBE Manufacturers
- CJ WildBird Food Ltd.
GBE Products
- Cambridge Swift Box Block
- Cambridge Swift Entrance Brick
GBE Accessories
- Cavity Tray DPC
GBS Robust Specification
- Cambridge swift box system
© GBE NGS ASWS Brian Murphy aka BrianSpecMan
26th August 2016 – 2nd September 2016
